Being Greek, our family has made olives for generations. I have vivid memories of sitting in the wine cellar on chilly winter evenings, dunking into Papu’s gigantic ceramic crock with a long-handled ladle; fishing out briny, bright-green and scrumptious homemade olives, and (occasionally) eating so many as to spoil my appetite for dinner. Water-cured olives (see previous post) are a bit simpler to make, but lye-cured olives have a particularly rich, almost buttery flavor that make them well worth the extra effort. And, really, it’s a much shorter process than the weeks of soaking-and-draining necessary for water-curing; you’ll just need to set aside a day or so when you can tend your olives every few hours.
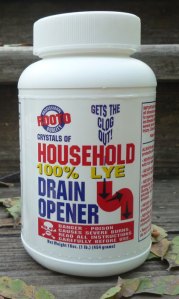
In the olden days, everyone around here would use Lewis Lye for making olives. Nowadays — at our local hardware store, anyhow — our friend Lewis has been replaced by a product with the rather alarming name of “Rooto.” It’s sold as a drain cleaner, and costs three or four dollars a bottle (plenty for several batches of olives.) Just make sure whatever kind you buy clearly specifies “100% Lye” or “sodium hydroxide” on the label. If it doesn’t, or if there are any other ingredients in the product, don’t buy it; go to another store and try again. Look for lye in crystal form — liquid or flakes may measure differently and throw off the recipe.
It goes against everything your mother, grandmother, and kindergarten teacher ever taught you to put something called “Rooto” — found in the drain-cleaner section of the hardware store — in (or even near) your food, and, yes, you should use caution here. Lye is nasty stuff, as the riot of warnings on the label will inform you. Read those, okay? Make sure that you only use glass, plastic, stainless steel, ceramic, or wooden containers and utensils for this project, as some metals can react with lye to produce hydrogen gas or poison your olives. It’s also highly corrosive, and can cause serious burns to skin. Treat it like bleach, and act accordingly: don’t touch it with bare hands, and if you are accident-prone, wear goggles and gloves to be safe. A short list of things that should be kept far away from lye:
• Aluminum, tin, and galvanized metal containers and utensils
• Skin and eyes
• Food (other than the olives, of course)
• Children
• Pets
• Clothing
• Anything you really value
All that being said, there’s really nothing to be afraid of when it comes to making lye-cured olives. Just use common sense and caution in handling the lye, and follow the directions, and you’ll be just fine. All the lye gets washed out of the olives by the time you finish them, so they are quite safe to eat — and you’ll be in good company with the Scandinavians and their lutefisk, or the Native Americans and their hominy, or even the Germans with their pretzels… (hey, olives aren’t the only food you can make with lye! Just don’t get carried away with the experiments.)
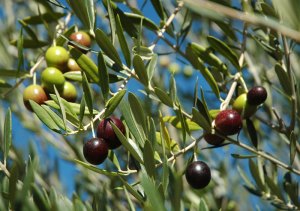
You’ll need mature green olives for this recipe. To make sure olives are ready to be picked, give one a squeeze; a milky white juice should show. A tree will usually have olives of various stages of ripeness on the same branch, so if there are some red or black fruits on the tree, their greener neighbours are probably mature enough to be picked.
Olive trees are often planted for their looks; these are the trees that spangle the sidewalk with smashed purple fruits come autumn. The next time you spot an olive tree heavy with fruit, ask its owners if you might pick a bucket or two — chances are, they would be only too thrilled if you would please take the entire crop, far, far away, and do with them whatever you like, just get those foul little things out of our yard… so, of course you must now call all your friends and have yourselves an olive-making party!
Lye-Cured Green Olives
That gigantic olive crock has gotten a little too cracked and pitted from so many years of lye and salt (not to mention age itself), so this year I’m using a five-gallon food-grade plastic bucket instead… it works just as well, even if it isn’t quite so nice, and will do the trick until I can find another crock (ideas, anyone?) Whatever your container, fill it about half full of olives — in this case, about 2 1/2 gallons of fruit.
This is a combination of my grandfather’s and uncle’s recipes for lye-cured olives. The lye soak takes anywhere from eight to twelve hours or longer, so plan carefully when you will start it. If you put your olives in to cure at 9 in the morning, they should be ready to rinse before bedtime; if you start them in the afternoon, you may be up all night checking them. After you have done a few batches and have an idea of what to expect, you could start them in the evening, let them soak overnight, and rinse them in the morning. Be sure to set up near a garden hose with household water, away from plants or lawns, preferably on gravel or pavement that you don’t mind getting a bit stained temporarily (the lye darkens everything it touches, but this should eventually wash away.)
ingredients and supplies:
• Mature green olives (once again, even size and ripeness is important; you want them all to finish curing at the same time)
• 2/3 cup lye (100% pure)
• 2 1/4 gallons cold water
• Two ceramic, glass, or plastic containers — five gallons is a good manageable size — one for olives, the other to mix lye and brine in
• Lid for container, or piece of plywood or similar to cover
• Wooden, plastic, or stainless steel long-handled spoon and tongs
• Old washcloth or other small piece of fabric (white or undyed; colors may leach)
• Colander (plastic or stainless)
• Rubber gloves (and goggles if you like)
• Garden hose with household/potable water
• Stainless steel knife
Rinse and drain the olives; place them in the bucket you want to make them in. Pour 2 1/4 gallons cold water into your mixing bucket, and sprinkle the lye over the surface. Use the long-handled spoon to mix well, being careful not to splash. The lye will sink to the bottom and form a crust; be sure to scrape this up and dissolve it thoroughly into the water.
The lye will heat the water as it dissolves; if you start with very cold water, it won’t be too warm for the olives (you don’t want to cook them.) If the outside of the bucket feels warm, check the temperature — it’s OK if the mixture is below 70°. Otherwise, allow it to cool before proceeding.
Pour the lye solution over the olives and stir. If you have extra lye solution left, pour it down a household drain — never near plants or down a storm drain.
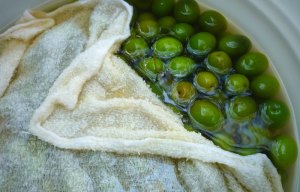
For the first hour, stir the olives every fifteen minutes to prevent them from blistering in the lye. After that, stir every hour or two. Cover the surface with a washcloth or other piece of fabric; this will keep the olives from darkening with air contact. (Use the tongs to position the cloth.)
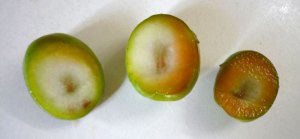
After about four hours, fish out one of the olives with your spoon, rinse it well, and slice it open to the pit. You’ll notice a ring of yellow-green flesh around the outside, while the inside will be a creamy white. The yellow area is where the lye has penetrated, while the white has not yet been reached — eventually, you want the entire inside to be yellow. Check a couple olives again after six hours, and continue to check every hour after that.
The yellow areas will darken to brown with air exposure, making it easier to see how deeply the lye has penetrated. The olive on the left has been in the solution for four hours, while the one on the far right is almost finished, after nine hours. This batch of olives took about 9 1/2 hours total to soak; when the olives start to sink, instead of float, you’ll know they are almost done.
As soon as the olives are completely yellow inside — check three or four of different sizes — carefully pour off the lye solution, wearing rubber gloves. (We covered the top of the bucket with a large colander and inverted the entire thing.) Rinse several times with clean water, until the water is no longer brownish.
Now that the lye has leached the bitterness out of the olives, you’ll need to leach out the lye. This can take several days to a week, depending on your method and the size of the olives. We stick a garden hose all the way to the bottom of the bucket, set it on a slow trickle, and place the bucket lid or a piece of wood ajar on top to keep out leaves and curious critters. If you don’t want to leave your water running, you could also just fill the bucket with water and then change the water several times a day; this method may take a bit longer. Either way, give them a stir once in a while, and slice into an olive occasionally after a day or so to see if it still feels soapy or slippery inside.
When the water no longer looks brownish, yellowish, or pinkish — after at least several days — slice open an olive and carefully taste it. When you can no longer detect any lye (it has a soapy taste), drain the olives and mix the brine:
Fill your mixing bucket with water — as much as you used to mix the lye, in this case 2 1/4 gallons — and add salt, stirring to dissolve thoroughly, until an egg (unboiled) floats in the brine, with a dime-size area of shell showing above the surface. Pour brine over olives and allow to set for at least several days before eating; you may wish to rinse the olives or soak them for a few hours in water to remove some of the salt before eating them. They may be portioned into pint mason jars and marinated with oil, vinegar, and/or whatever herbs you like — my uncle John makes fantastic olives with garlic and lemon, and oregano or thyme, or even chilies would also be delicious. Keep marinated olives in the refrigerator; your regular olives may be stored, in brine, for months in the fridge or even just in a cool place. (If the olives in brine start to feel a bit “slimy,” drain them and add a new batch of brine; the olives are good as long as they remain firm in texture.)
Making lye-cured olives isn’t scary or dangerous or even all that complicated — it just takes a bit of caution and patience, and the results are well worth every bit of work that goes into them! The UC Extension publication “Olives: Safe Methods for Home Pickling” has plenty of information on lye-curing olives, including safety tips and instructions for canning or freezing your olives. It can be downloaded for free here: http://anrcatalog.ucdavis.edu/Olives/8267.aspx

